
Pumpkin and Chocolate Bread Rolls
- Sibel

- Oct 25, 2022
- 5 min read
It’s pumpkin season, so these pumpkin and chocolate bread rolls are a must! These fluffy rolls are filled with a rich and creamy pumpkin and chocolate filling and they’re surprisingly easy to make. They're the perfect treat for an Autumn or Halloween celebration!

Pumpkin and chocolate filled bread rolls are one of my favourite things to bake during pumpkin season! They’re a fun way to incorporate pumpkin into your baking and the realistic pumpkin appearance is sure to impress at any party! These pillowy, soft pull-apart savoury bread rolls are stuffed with a rich, chocolatey pumpkin filling and are surprisingly easy to make. What’s more, they are more nutritious than plain old bread rolls, so they’d be perfect for breakfast.
Why Make these Pumpkin and Chocolate Rolls?
You don’t need any fancy baking equipment to make this recipe
It’s a great way to incorporate seasonal pumpkins into your baking
They’re aesthetically pleasing so they’d be perfect for serving at parties
Easy to customize the fillings
Made with easily available store-bought ingredients

Are Pumpkin and Potato Rolls Difficult to Make?
These sweet bread rolls are surprising easy to make. The only part that can get a little fiddly is tying the thread around the buns to create the pumpkin shape. The key thing to remember when making any kind of yeasted bread is to use lukewarm liquid when making the dough, and letting the dough prove at room temperature, which will ensure the dough rises properly. It’s also important to allow the filling to chill before shaping the rolls as it’ll make it much easier to handle.

Ingredients for the Pumpkin and Chocolate Rolls
Here’s everything you’ll need for this recipe – consider it your shopping list!
For the bread dough, you will need:
Flour: Bread flour is always preferable when baking bread as it has a higher protein content, but you can use all-purpose flour if you can't get your hands on bread flour.
Yeast: I used instant dry yeast as it is easier to find in supermarkets.
Sugar: a little bit of sugar will help to activate the yeast.
Milk: Unsweetened almond milk is my go-to plant-based milk when it comes to cooking and baking. Depending on which brand you use, the taste is quite mild so it’s great for both sweet and savoury dishes. You could substitute almond milk with other neutral tasting, unsweetened plant-based milks such as oat or soy milk.
Orange food colouring: This is optional, but for a more intense colour, you can add a few teaspoons of vegan orange food colouring.
For the pumpkin and chocolate filling, you will need:
Pumpkin: I’d recommend you use small, sugar pumpkins as they has a more dense and creamy flesh.
Vegan chocolate spread: I used a dairy-free hazelnut and chocolate spread, but melted vegan chocolate can be used instead.
Agave syrup: The agave syrup is used to sweeten the filling. Dark or light agave syrup will do. If you don't have any agave syrup, you can use another other type of sweet fruit syrup or maple syrup instead.
Chocolate chips: You'll need a few tablespoon of vegan milk chocolate chips of chunks.
To shape and decorate:
Thread: You will need some cotton thread to create the pumpkin shape. I’d recommend using some thin sewing thread as it’ll give the baked rolls a more realistic pumpkin appearance.
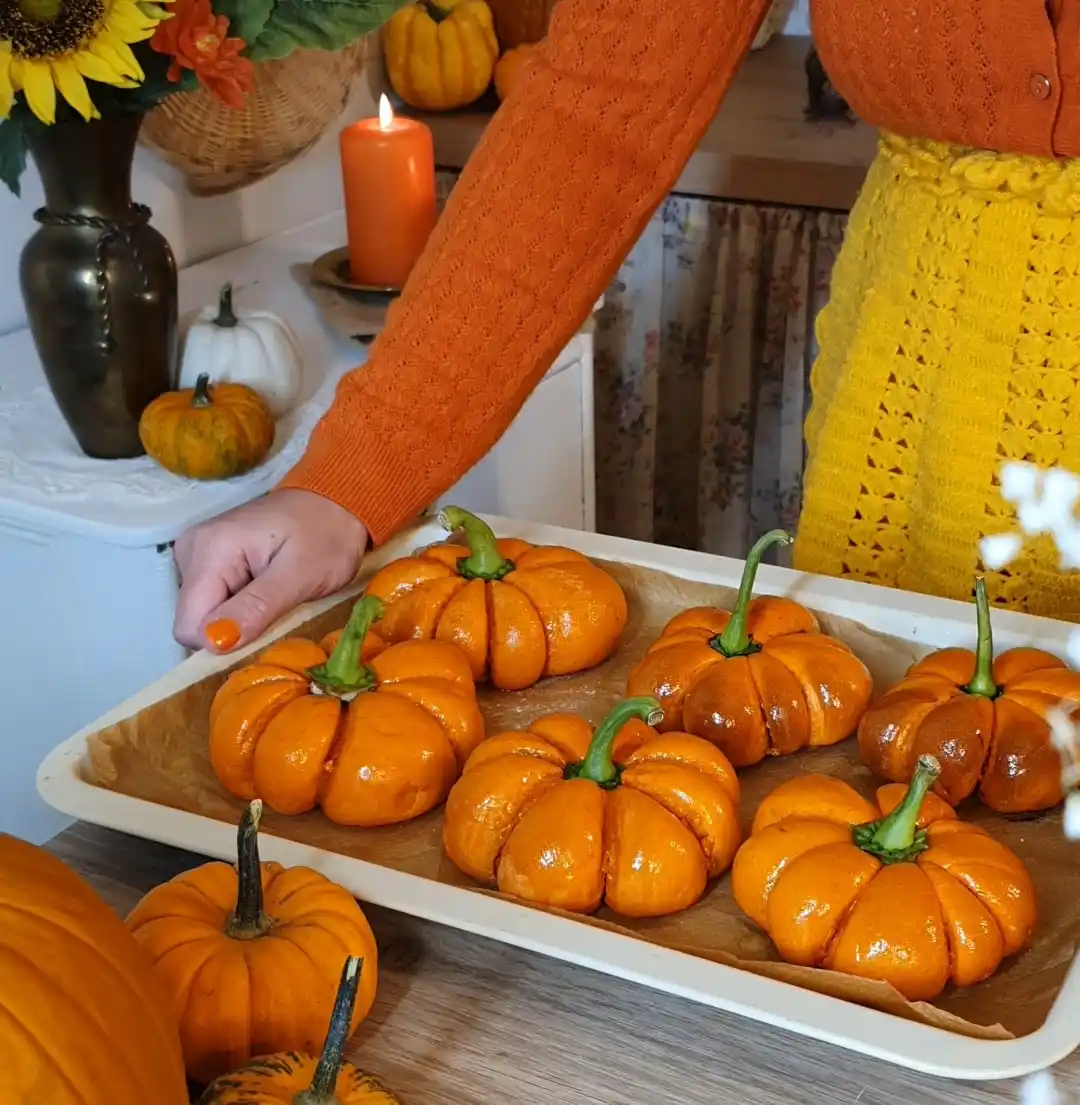
Bell pepper stalks: I’ve used the stalks that I’ve cut out from some bell peppers as they look very similar to pumpkin stalks, also known as peduncles. If you don’t have any bell pepper stalks at hand, you can use some thin bread stick pieces or you can insert pumpkin seeds into the tops.

How to Make Pumpkin and Chocolate Bread Rolls
STEP 1:
Add the warm almond milk and instant dry yeast to a large measuring jug, give it a whisk and let it sit for about 2 minutes, or until the yeast starts to bubble up. Add the flour, sugar and optional food colouring to a large bowl, then pour the almond milk and yeast mixture into the bowl and mix with a wooden spoon until it comes together.
STEP 2:
Lightly dust a clean counter with flour and transfer the dough onto the surface. Knead for about 10 minutes to form a smooth and elastic dough, or until the dough is not sticking to your hands. Transfer the dough to clean bowl, cover the top with cling film and let it prove for about 30 minutes, or until it has doubled in size.

STEP 3:
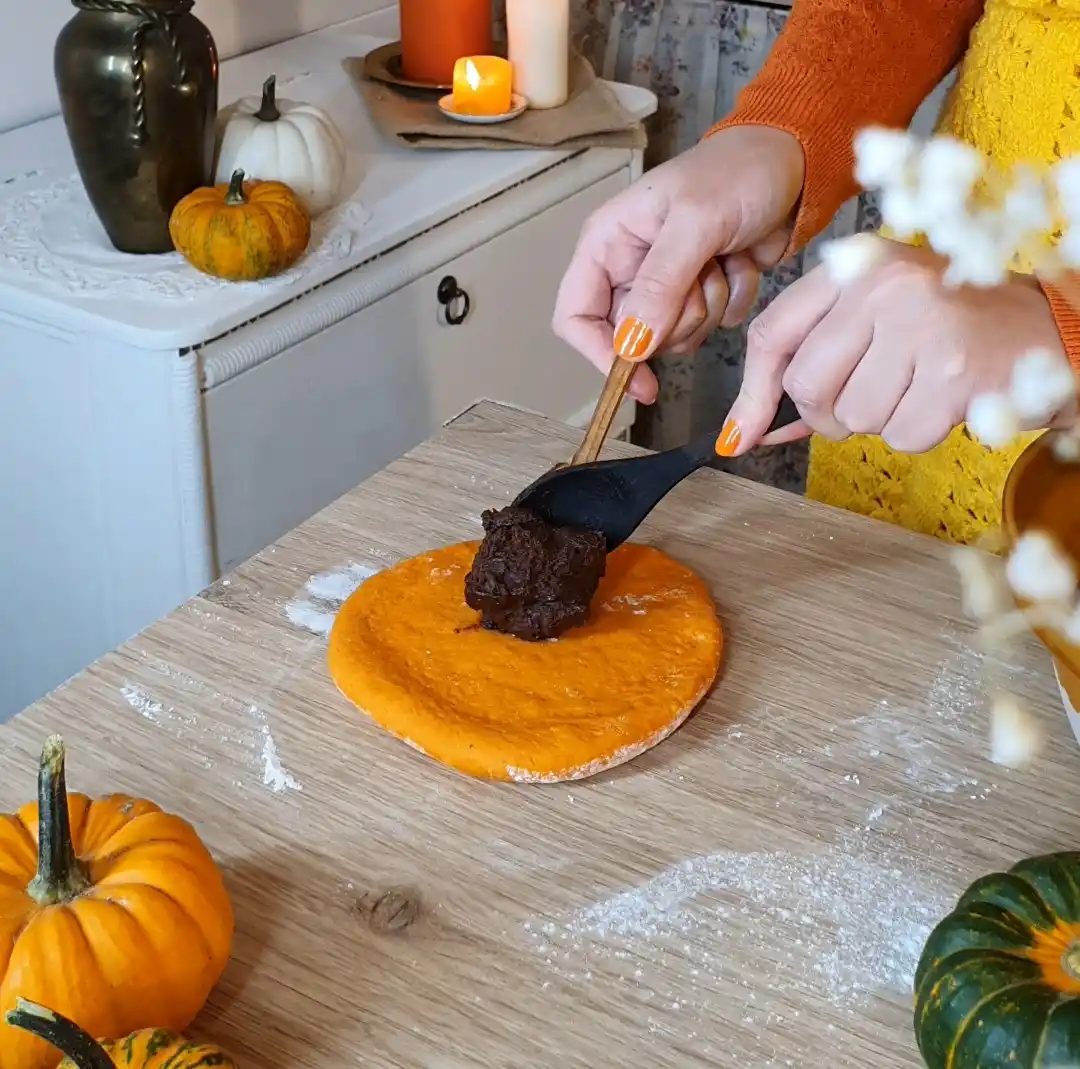
In the meantime, prepare the filling. Add the pumpkin puree, chocolate spread, agave syrup and chocolate chips to a medium bowl and stir to combine. Cover the bowl with cling film and place in the freezer to harden for 1-2 hours.


STEP 4:
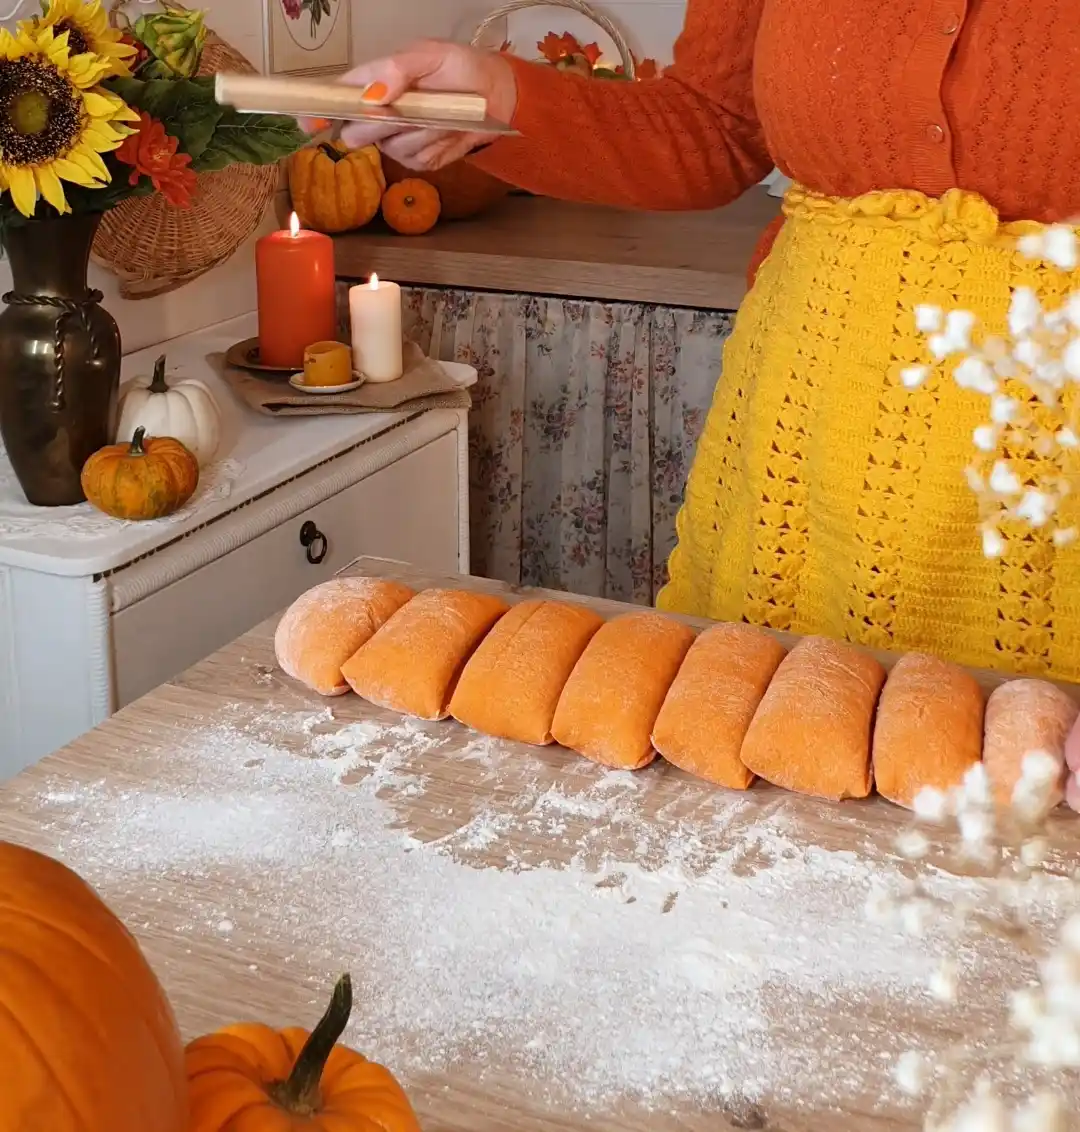
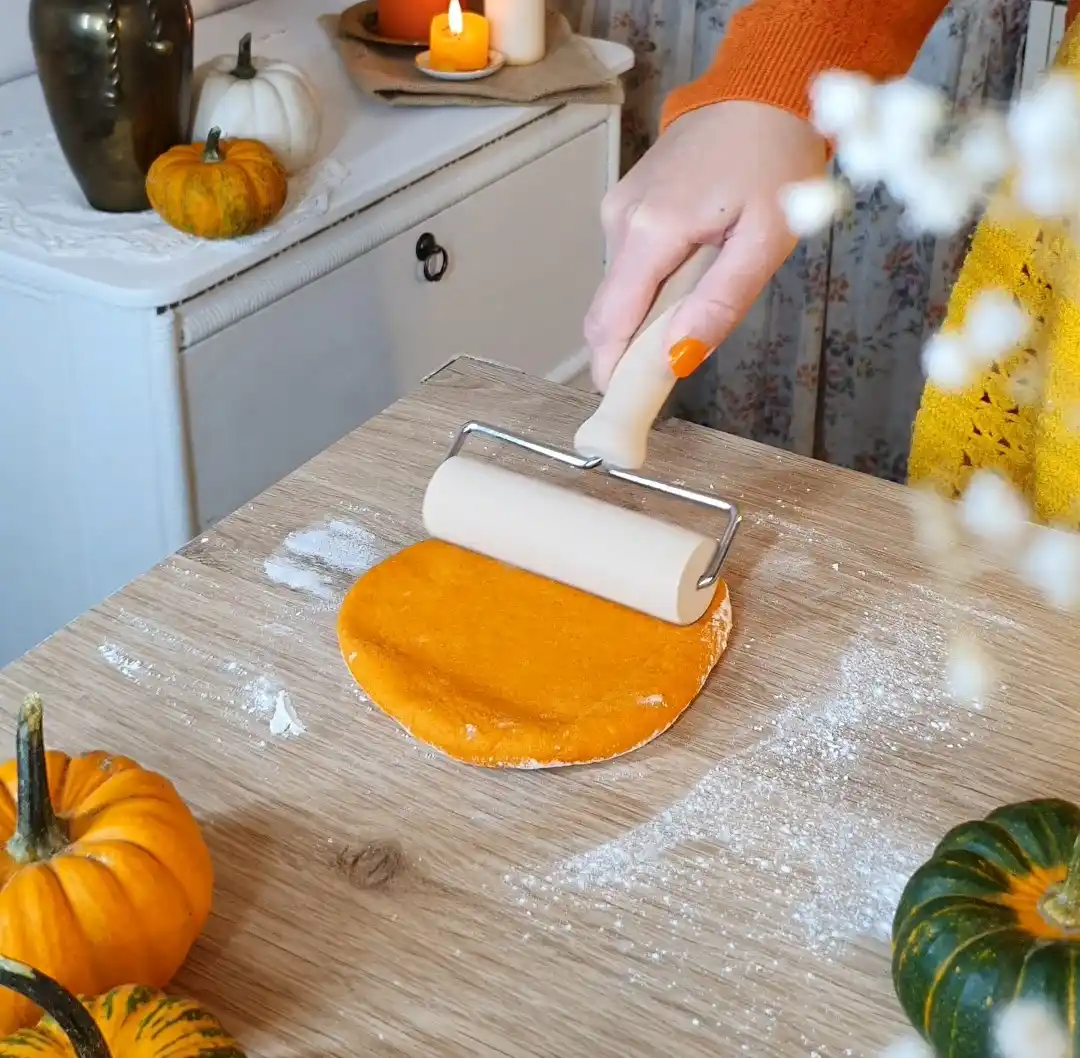
Once the dough has risen, divide it into 8 even pieces. Roll one of the pieces of dough out on a lightly floured surface to create a 13cm (5 inch) circle.
STEP 5:
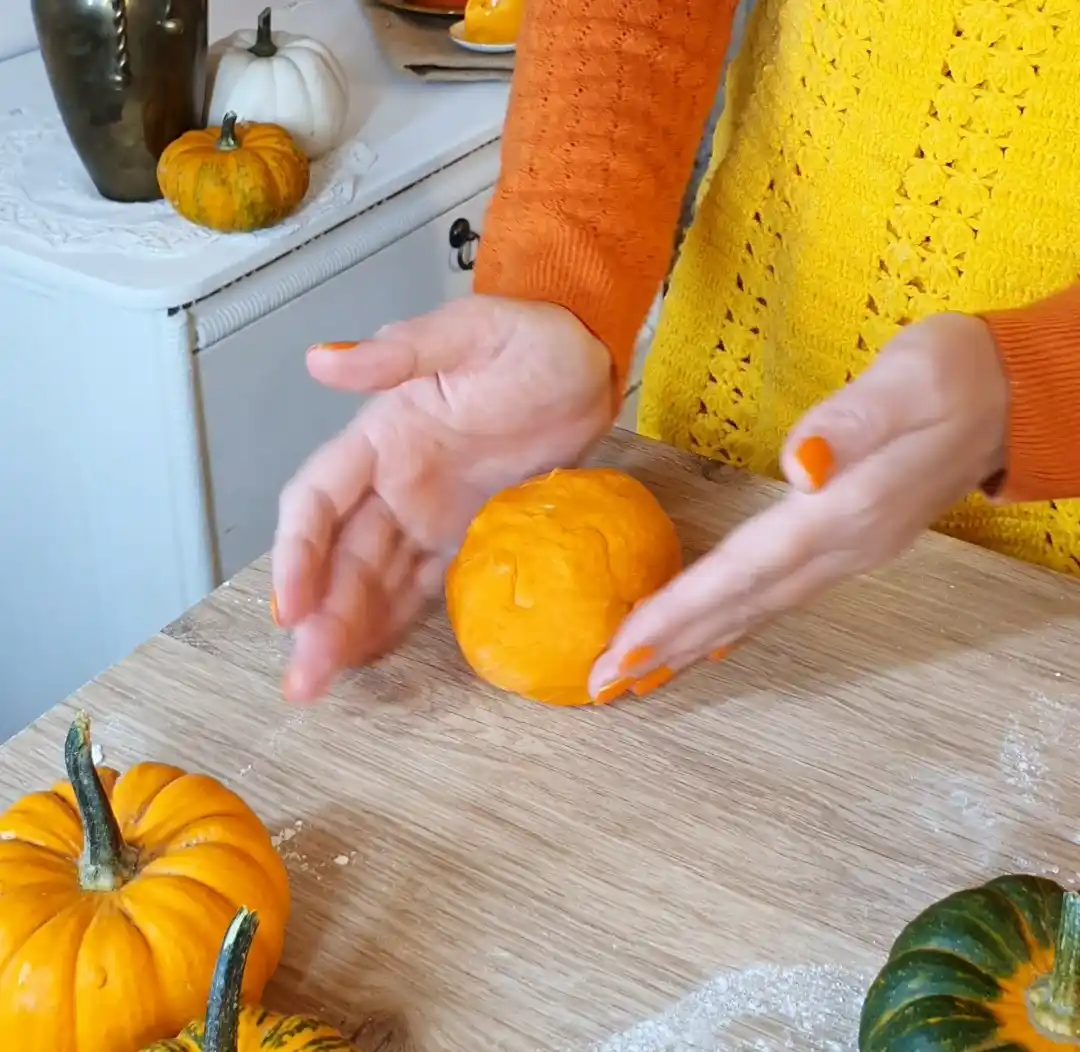
Add 1 tbsp of the filling in the centre of the dough and pinch the edges into the centre until the filling is sealed. Make sure not to add too much filling because it'll make it more difficult to create the pumpkin shape. Roll the filled dough to create a smooth ball. Repeat the process with each piece of dough.
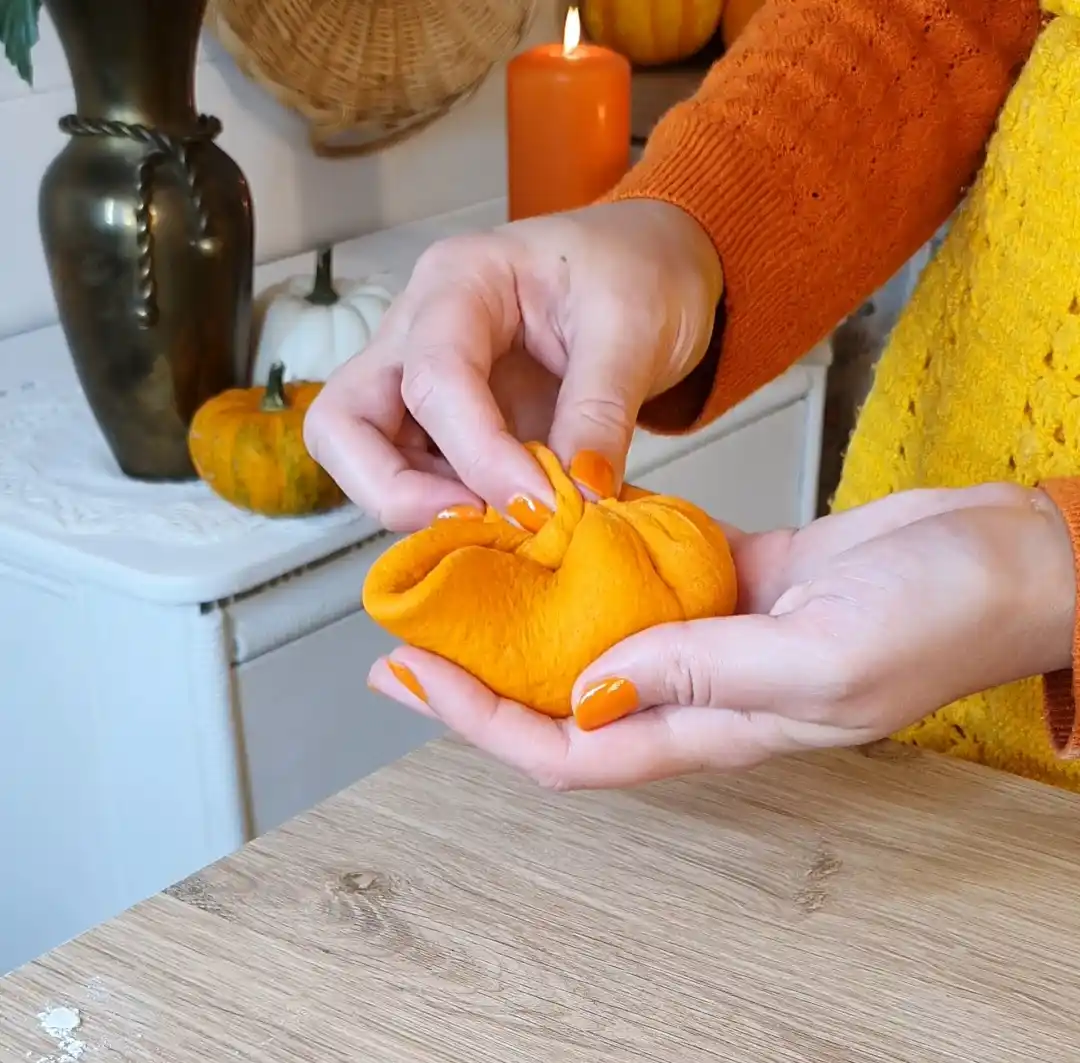
STEP 6:
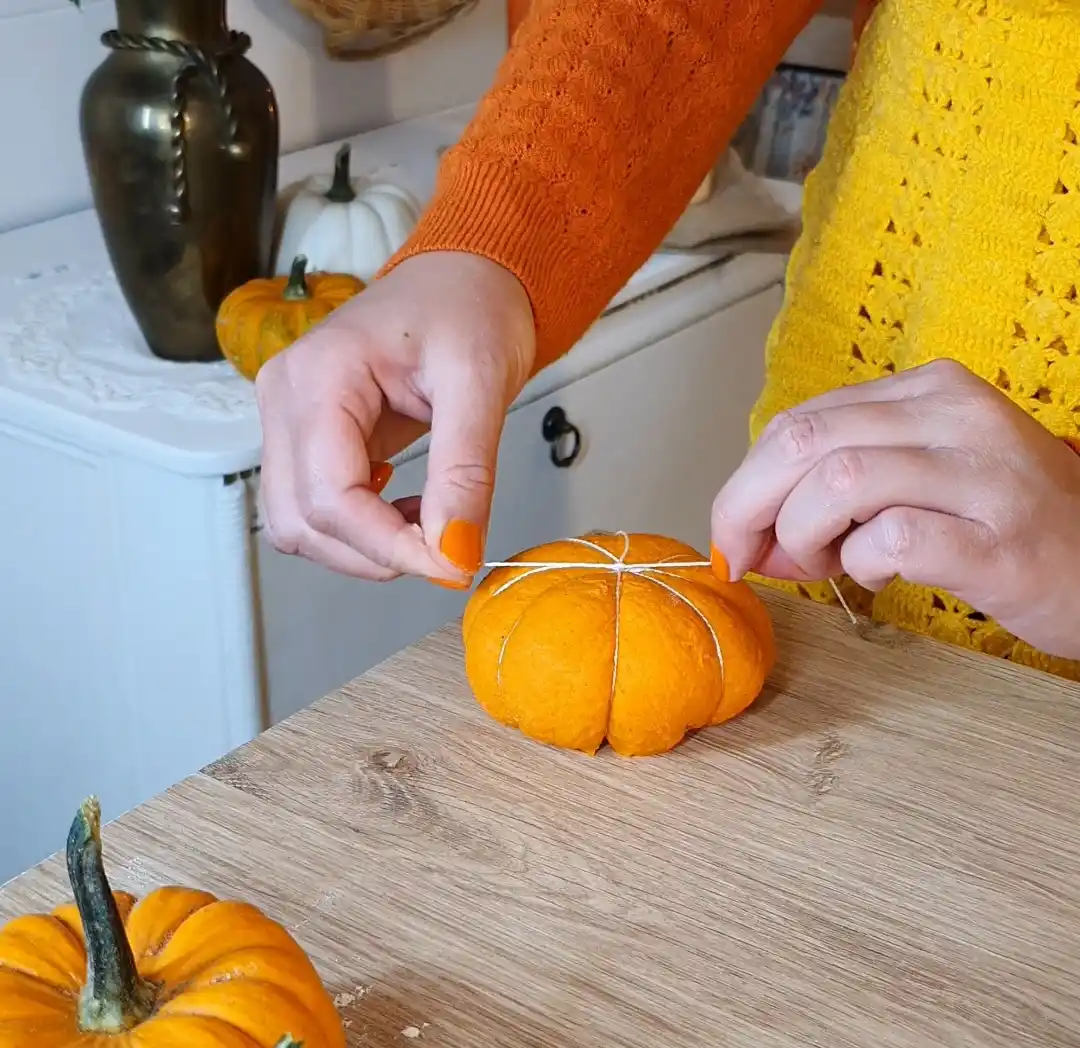
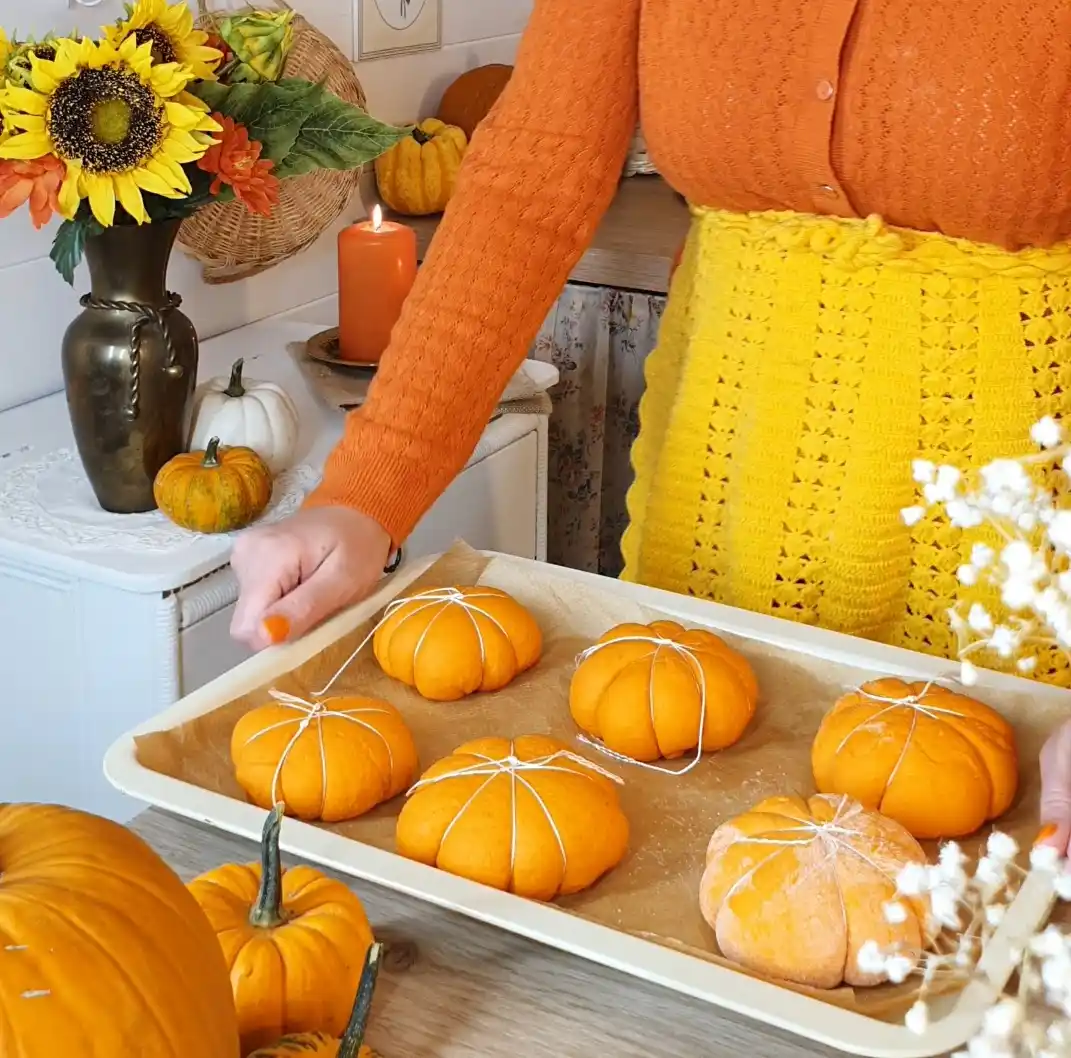
To shape the rolls using cotton thread, take a long piece of thread and find the halfway point. Place the half way point on top of the ball of dough and flip the whole thing over. Pull the two pieces of thread together and cross them over to create a cross on the bottom of the dough. Flip it over again and do the same thing until the bun is divided into 8 segments. It is important to make sure that the thread isn't too tight as the dough will continue to rise. Tie the thread at the top and cut off any excess.
STEP 7:
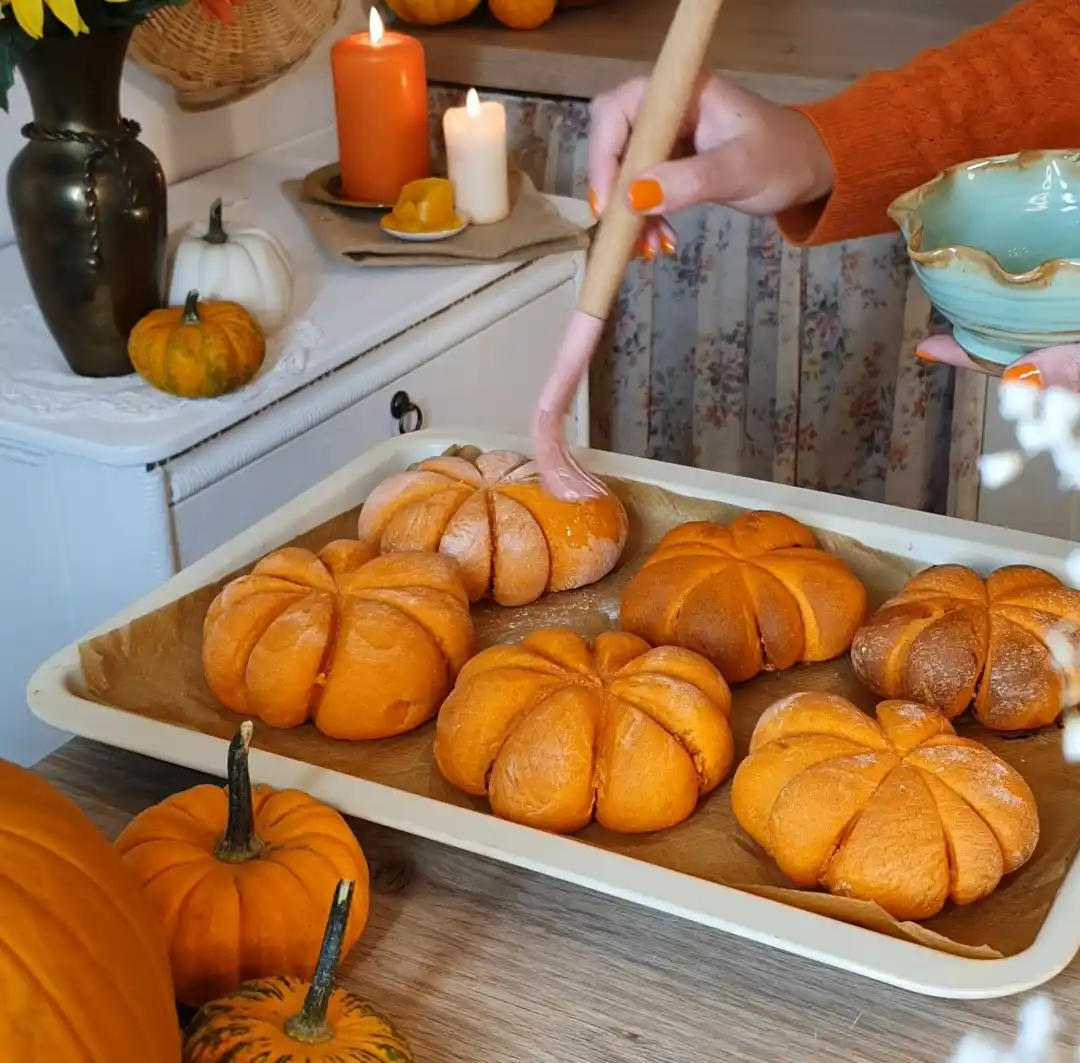
Preheat the oven to 220°C. leave them to prove for a further 20 minutes. Place them in the oven to bake for 12-15 minutes, or until lightly golden on top. Leave the baked rolls to cool down before carefully cutting and removing the thread from the rolls, then brush each roll with melted butter. This step is optional, but if you’d like your rolls to look more like pumpkins, you can push a bell pepper stalk into the top of each roll. I’ve used the stalks that I’ve cut out from some bell peppers as they look very similar to pumpkin stalks, but If you don’t have any bell pepper stalks at hand, you can use some thin bread stick pieces instead, or you can insert pumpkin seeds into the tops.

Storing Pumpkin and Chocolate Bread Rolls
Store these rolls in an airtight container and they’ll stay good for up to 3 days at room temperature or store them in the fridge and they’ll keep well for up to 5 days. To reheat, place in the microwave for 20 seconds or bake in the oven at 180C for 10-15 minutes.
Can these Rolls be Frozen?
If you’d like to prepare these rolls in advance, follow the instructions, then freeze the rolls in a baking tray. Once frozen, they won’t stick together anymore, so you can place them in a freezer bag. Let them thaw and rise for about 3-4 hours, then bake. You can also freeze the baked bread rolls and store them in the freezer for up to a month.

Notes and Tips
I’d recommend you use the gram measurements rather than the cup conversions. When it comes to baking, accuracy is key, and cups conversions are never as accurate as grams.
I’d recommend using some thin sewing thread to shape the rolls as it’ll give the baked rolls a more realistic pumpkin appearance. I’ve tried using cooking twine to make these rolls, but because of its thickness, it can end up making the rolls look like flowers rather than pumpkins.
Customize the filling: if you’re not a fan of some of the ingredients or you don’t have them at hand, you can play around with the fillings - try various combinations of fillings such as: pumpkin with caramel or pumpkin and cinnamon.
Although bread flour is recommended for this recipe, you can easily substitute it for regular all-purpose flour or wholewheat flour.


👏🏻👏🏻👏🏻😋👍🏻